 Home User Guide
Logging in to Finance Automation
When a user logs in to Finance Automation, what they experience will depend on their assigned roles. They will either log in to the Home screen or the Control Center. The Home screen provides business users with a streamlined user interface designed for their specific needs. The Control Center is a separate component used for automation development and configuration.
Home Screen
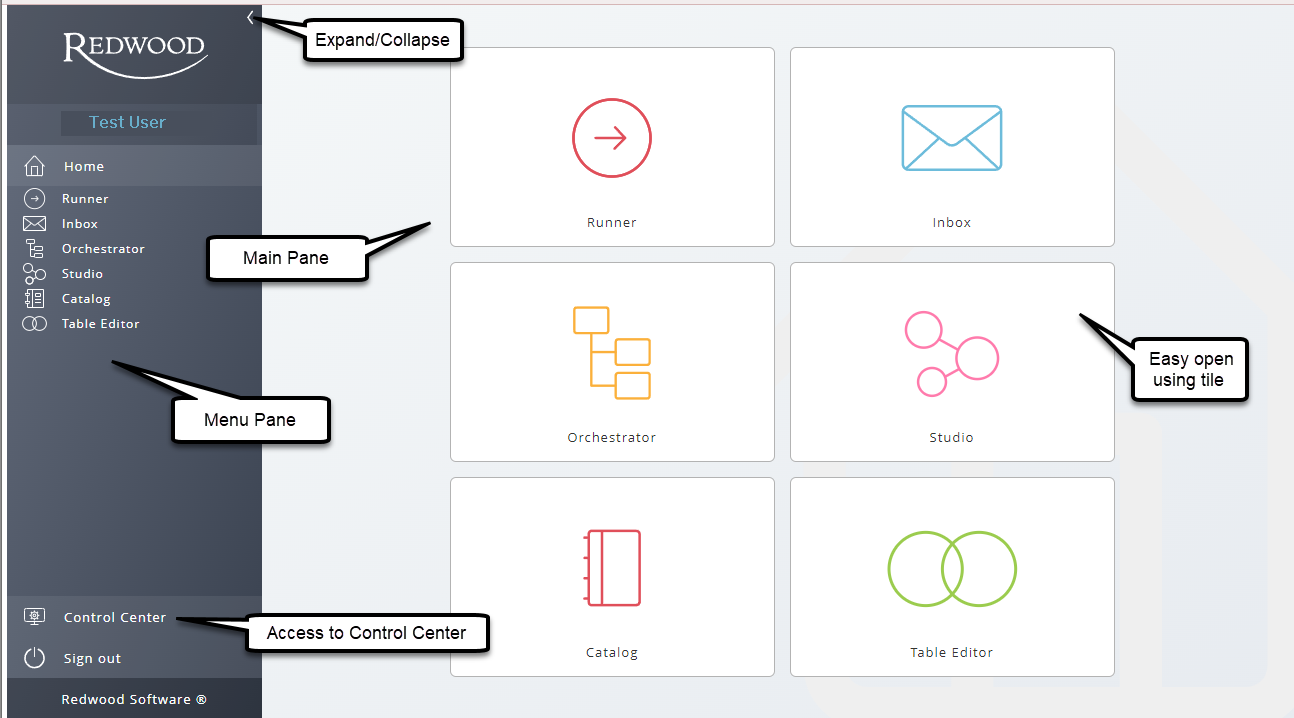
On the left-hand side of the Home screen is a menu pane that consists of a list of menu items, starting with Home at the top. The remaining menu items and the order in which they appear can be customized by role or user. Further customization allows menu items to be organized into groups. Therefore, the menu items that are displayed after logging in depends on whether the default Home screen or a customized one is being used. How to customize the Home screen is discussed in the Home Screen Customization section below. On the right-hand side of the Home screen is the main pane that consists of tiles that match the menu pane item names, or the group name if the group customization feature is being used.
The Home screen menu pane can be collapsed or expanded by clicking on the caret in the upper right-hand corner of the menu pane. When the pane is collapsed, the menu pane's text will be hidden, but the menu icons will remain visible and can be clicked on to select the desired tool.
There are two ways to access a tool from the Home screen. You can click on the menu item in the menu pane, or you can click on the equivalent tile displayed on the main pane. If the menu is customized and you click on a group name in the menu, or you click on the equivalent group tile, you must then select a menu item or tile within the group. After making a selection, the selected tool's information will be displayed inline in the main pane, or in a popup window. The behavior (inline or popup) is configurable, discussed in the Home Screen Customization section below. If the menu item is configured to be displayed inline, you can still open it in a popup window by right-clicking on the menu item or its equivalent tile, then selecting Open in Popup.
Home Screen Customization
Roles - Default Behavior
- A user assigned to the
scheduler-business-userrole will always log in to the Home screen. - A user assigned to the
scheduler-business-userrole and thescheduler-it-user-roleor thescheduler-administratororredwood-administratorrole will log in to the Home screen, and by default will have access to the Control Center via a link in the Home screen's menu pane. The default behavior regarding access to the Control Center from the Home screen can be changed by a registry setting. For more details, see the section below named Configure Control Center Access Using the Registry. - A user assigned to the
scheduler-it-userorscheduler-administratororredwood-administratorrole, but not assigned to thescheduler-business-userrole will log in to the Control Center. The Control Center provides a link to the Home screen.
Registry Keys
Controlling the Main Page
This registry entry allows you to display a module (extension point) as the main page when users with a specific role (usually scheduler-business-user) log on. You specify the module (extension point) using its business key, ExtensionPoint:<partition>.<extension_point> such as ExtensionPoint:FCA.Redwood_Home.
Syntax:
/system/ui/configuration/behavior/MainPage/<role>/businesskey=<BusinessKey>
Example:
/system/ui/configuration/behavior/MainPage/scheduler-business-user/businesskey=FCA.Redwood_Home
Configure Control Center Access Using the Registry
You override default Control Center access by configuring a registry setting. Using the Control Center component, navigate to "Configuration > Registry", then select /configuration/jcs/apps/home/additionalcontrolcenteraccessroles. If the apps/home/additionalcontrolcenteraccessroles path is not present, you will need to create it within the jcs parent registry entry. The default value when the registry is not set is scheduler-it-user. You can specify one or more comma separated (JSON array syntax) roles ["scheduler-business-user"] or simply enter [] if you only wish to allow administrators to see the Control Center link. When adding specific role name(s), include the opening and closing brackets, and the quotations around the role name - for example ["Role1","Role2"].
Configuring the Home Screen Items
The Finance Automation environment includes a built-in table named Home_Modules. This table contains configuration information used for the default Home screen. The table's fields cannot be modified. However, you can create a custom Home screen, for a role or user, by following the steps below:
- Using the Control Center component, navigate to "Scripting > Tables".
- Choose Duplicate from the context-menu of table Home_Modules.
- In the Table tab, fill
CUS_Home_Modules_[Role/User]into the Name field.- Example table Name for a role: CUS_Home_Modules_scheduler_user, where the role name is
scheduler-user. - Example table Name for a user: CUS_Home_Modules_scheduler_john_doe_example_com, where the user logs in to Finance Automation using
<john.doe!example.com>. The characters!and.must be replaced with underscores.
- Example table Name for a role: CUS_Home_Modules_scheduler_user, where the role name is
- In the Table tab, assign the table to the built-in Application named CUS_FCA.
- Choose the Values tab. It is here that the menu items are configured for the Home screen.
note
If a custom role-based Home screen is configured and a user is assigned to that role, and the same user has a user-level Home screen configured for them, the user Home screen takes precedence.
In the table edit screen, on the Values tab, the following fields are available:
| Field | Description |
|---|---|
| Key | This is a unique number used to identify the Home screen option. |
| name | This is the extension point (ep) or URL (url) name, which are the two supported Home screen option types. When configuring an extension point, the name and source fields should be the same. When configuring a URL, use any name, but do not use special characters or spaces. |
| description | This is a description of the Home screen option as it will appear on the Home screen menu pane and the corresponding tile in the main pane. |
| order | This sets the order in which you see the options listed (this can deviate from the key). |
| source | This is the extension point name or URL. Please note you can see a list of installed extension points (modules) by accessing the Control Center and navigating to "Configuration > Extension Points". When configuring an extension point, the source field should be the same as the name field in the Control Center's Extension Points list. If the source is a URL, enter the appropriate link (for example https://example.com). The URL can be an intranet, Sharepoint page, web service, etc. |
| target | This specifies how you would like the selected Home screen option to appear in the user interface – inline or as a popup (window). Note, if inline is configured, the user will have the option to open it in a popup window. |
| type | This is the type of Home screen menu option, which is either an extension point or URL. Accepts ep or url. |
| role | When specified, this is the one or more roles (comma separated) that a user must have to access the menu item. |
| iconname | When specified, this is the icon that is displayed to the left of the Home screen menu item description. If left blank, the icon named "Generic1" will be used. See the Icon heading below for the list of icons you can choose from. |
| parameters | When specified, these are constant parameter(s) used only when configuring an extension point. |
| groupname | When specified, menu items are grouped together that have the same group name. This is used for organizational purposes. |
| groupiconname | When specified, this is the icon that is displayed to the left of the group name. You must specify a group icon name for one of the group members (menu items). The remaining members of the same group should not have this field populated. See the Icon heading below for the list of icons you can choose from. |
When the groupname field is configured, you will see the group name listed on the Home screen's menu pane, and it is also depicted as a corresponding tile in the main pane. If there are multiple groups configured, only one can be expanded at a time. By default, the topmost group in the menu pane is expanded, displaying its associated menu items. The currently expanded group is easily identified because there is an caret displayed to the right of the group name. Click on another group name (if any) in the menu pane to expand the selected group, then select the tool you wish to access. Alternatively, you can click on the group's equivalent tile in the main pane, then select a tile that depicts the tool you wish to access.
Icons
These icons are used in the iconname and groupiconname cells of CUS_Home_Modules tables. The name is case-insensitive.
Generic Icons
 -
- generic1(default icon if none was specified in the CUS_Home_Module table) -
- generic2 -
- generic3 -
- generic4 -
- generic5 -
- generic6 -
- generic7 -
- generic8 -
- generic9 -
- adhoc -
- admin -
- archive
Module Icons
 - Home icon named
 home - Balance Sheet Certification icon named
 balancesheetcertification, more are available: -
- dashboard_bsc -
- closemanagement -
- intercompany -
- journalentry
 - Document Editor icon named
 documenteditor - Inbox icon named
 inbox - Orchestrator icon named
 orchestrator - Runner icon named
 runner - Table Editor icon named
 tableeditor - Workbench icon named
 workbench
Parameters
Parameters are component-specific, see the component topic for available parameters of the component in question.
Syntax
<parameter>=<parameter_value>[,<parameter>=<parameter_value>]*
- BusinessKey parameter syntax is
BusinessKey=<partion>.<name>.- Data Extractor - business key of a data extractor.
- Data Transformer - business key of a data transformer.
- Document Editor - business key of a document.
- Orchestrator - business key of a process list.
- tableBusinessKeys parameter syntax is
tableBusinessKeys=table:<partition>.<name>[;table:<partition>.<name>]*- Table Editor - business keys of available tables in the table editor.
- Mode parameter syntax is
mode=admin. See below the behavior of the two listed modules when this parameter is set.- Runner - Security is bypassed when Runner starts, which means all the Runner-enabled process definitions and chains are displayed.
- This is to enhance performance when Runner starts. Security is enforced when the user attempts to run a definition in the list.
- Orchestrator -The Retention tab is enabled, and the Instance tab offers resubmit, kill, and restart context-menu options.
- Runner - Security is bypassed when Runner starts, which means all the Runner-enabled process definitions and chains are displayed.
Custom Home Screen Examples
Example 1
This custom Home screen example describes how to add the Orchestrator to a group. It also describes how to add a second Orchestrator menu option that provides direct access to a process list.
Orchestrator - Adding it to a group named Task Lists in the Home screen.
- Key - 3
- name -
Redwood_ProcessOrchestrator - description -
Orchestrator - order - 3
- source -
Redwood_ProcessOrchestrator - target -
Inline - type -
ep - iconname -
orchestrator - groupname -
Task Lists - groupiconname -
orchestrator
Orchestrator - Adding a parameter to access a process list.
- Key - 2
- name -
Redwood_ProcessOrchestrator - description -
Orchestrator – Direct access to list - order - 2
- source -
Redwood_ProcessOrchestrator - target -
Inline - type -
ep - iconname -
generics5 - parameters -
BusinessKey=REDWOOD.TEST_PL - groupname -
Task Lists
As per this example, the groupiconname only needs to be specified once, for any item in the same group. It does not matter which item is assigned the group icon name. In this example, the Key 3 item is assigned the group icon name.
Custom Home screen table

Custom Home screen menu and main pane
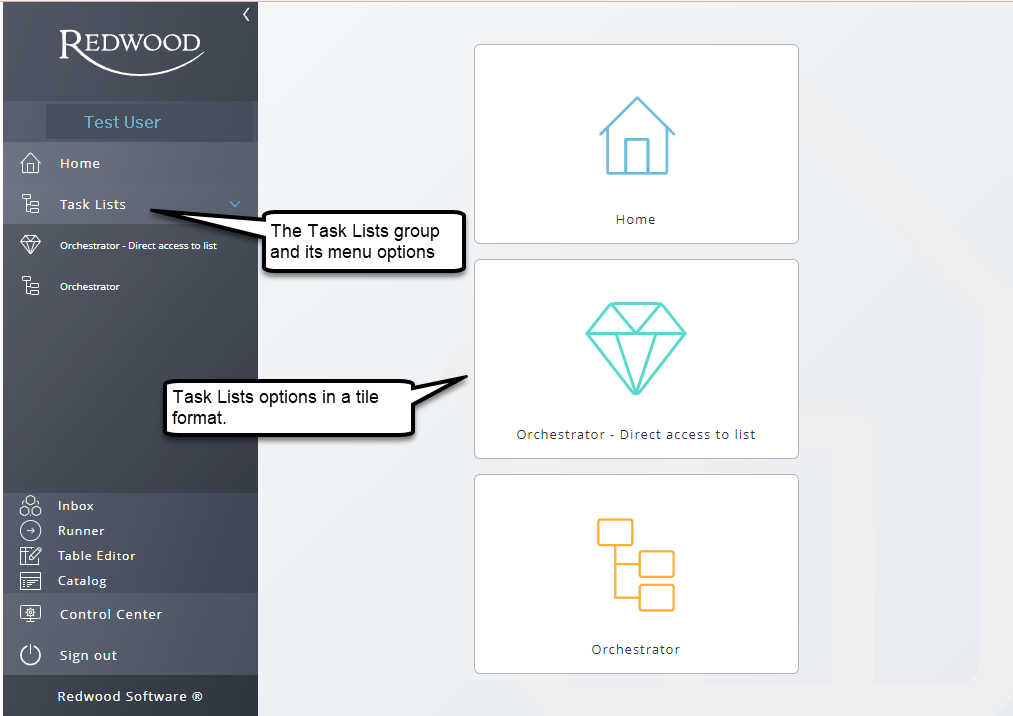
In summary, the custom Home screen includes a group named Task Lists. When the group is expanded in the menu pane, you will see two menu items, Orchestrator - Direct access to list, and under that, Orchestrator. In the main pane you will see three tiles, Home, Orchestrator- Direct access to list, and Orchestrator. Click on the menu or tile to make your selection.
Example 2
This custom Home screen example describes how to add the TableEditor extension point so that it includes a direct link to a specified table, where the data in the table is filtered.
- Key - 4
- name - Redwood_TableEditor
- description - Table Editor - Access Table
- order - 4
- source - Redwood_TableEditor
- target - Inline
- type - ep
- iconname - tableeditor
- parameters -
tableBusinessKeys=Table:REDWOOD.Company_Code_Mapping,filterColumnName=Currency,filterColumnValue=EUR(Note: The generic parameters syntax is:tableBusinessKeys=Table:[partition.table name],filterColumnName=[column name],filterColumnValue=[value]. Therefore, in this example,REDWOODis the partition name,Company_Code_Mappingis the table name,Currencyis the column name, and the filter is EUR).
Custom Home screen table

In summary, the custom Home screen displays the TableEditor tool as a single item in the menu pane, and as a tile in the main pane. When the tool is selected, the table named Company_Code_Mapping will display all the records where the Currency cell is equal to EUR.
See Also
financeTopic