 Table Editor User Guide
Table Editor
Tables are used to store data used in processes and other lookup procedures. For example, mapping customer ID numbers to customer names in tables would allow processes to present customer names instead of customer ID numbers to Operators.
Many complex processes consist of processes that work with the same parameter values, for instance:
- The name of an external system
- The processing day (or business day), which may not be the same as the current date
- The name of a business system instance or client to use for a specific task
These values tend to be used by many processes and change rarely. They might change:
- On a daily basis (for the business day)
- Between the Development, Quality Assurance and Production environments
In some cases, there may be a predefined set of values from which the user can choose:
- A list of countries, provinces, or cities
- A list of departments or cost codes
The Table Editor allows you to maintain or create tables easily.
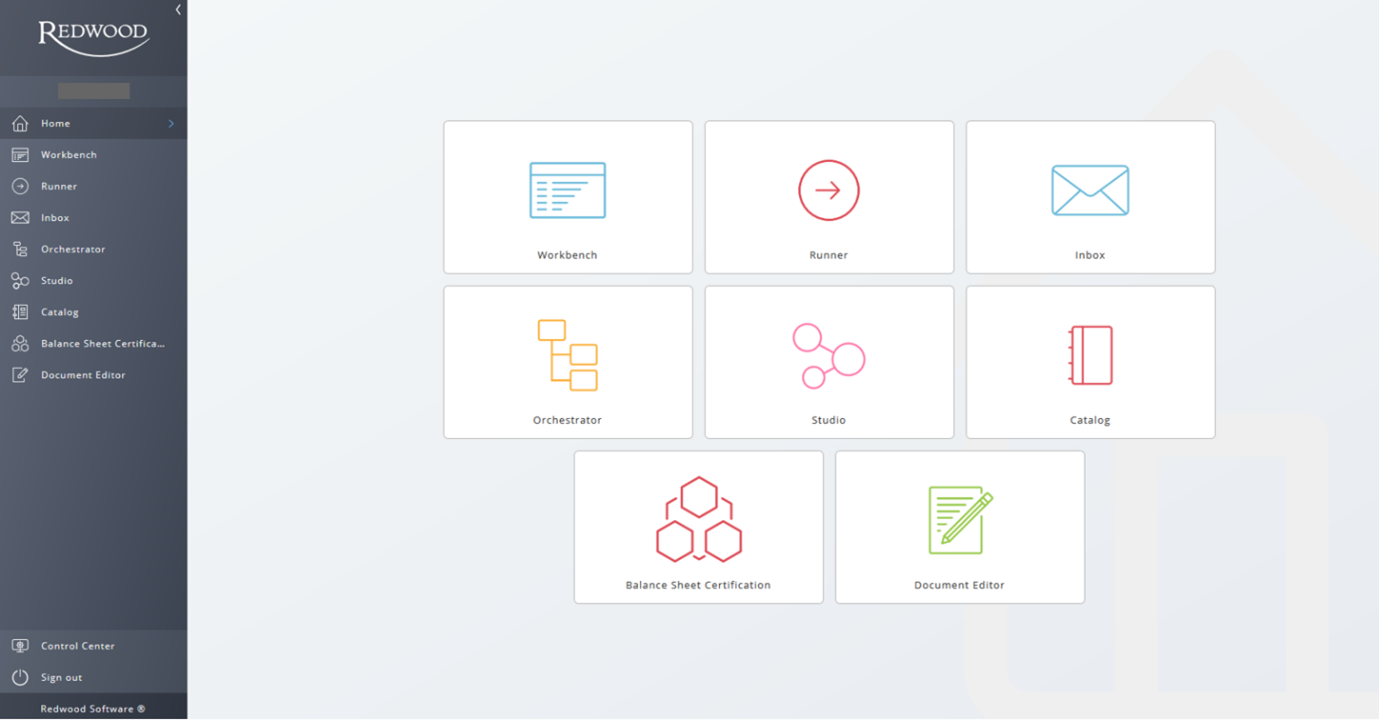
Figure 1: Finance Home Screen - Control Center
Open the Table Editor
To open the Table Editor:
- From the Redwood Home screen click Control Center at the bottom of the left-hand navigation bar.
- Click the Table Editor icon on the tool bar that appears above the main screen as shown in the image below.
- Tip: Hovering over the icons displays the name of each icon.

Figure 2: Table Editor Icon in Tool Bar
Create a New Table
Upon clicking the Table Editor icon, a popup window will appear with the option to create a new table based on an existing table definition or open an existing table. Creating a new table will create a table object where the data records are stored.
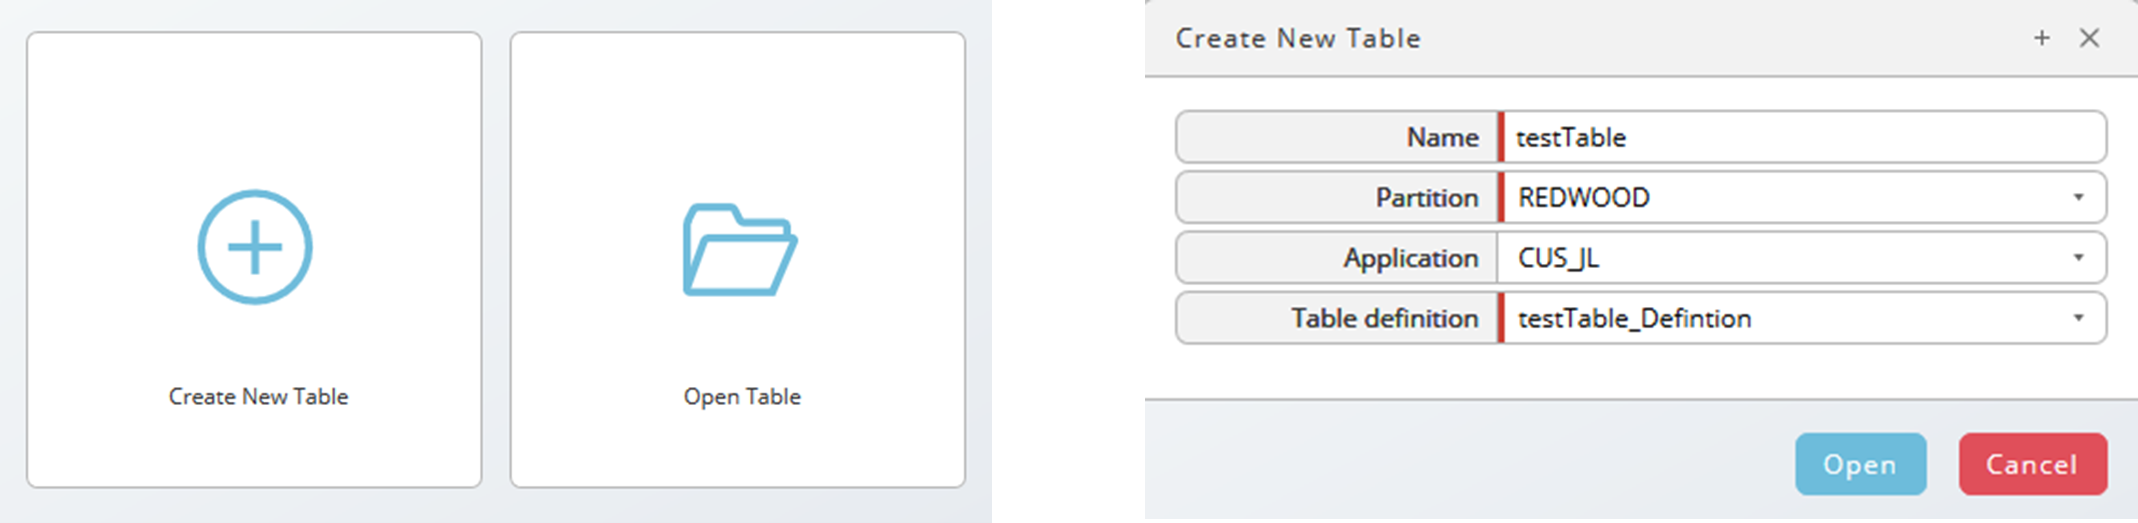
Figure 3: Table Editor - Create New Table
- Click Create New Table and enter the following required information:
- Name.
- Partition
- Table definition, which describes how the table should look. For more information about Table Definitions see Using Tables to Store Frequently Used Values.
- Application is optional.
- Click the Open button and the created table will appear, ready to fill data records.
Working with Tables
- Open the Table Editor.
- Click Open Table and select a table.
- Click on a field and enter the data. Note: The name, type and number of columns is defined in the related Table Definition. If a column is nullable, this means that a field in this type of column can be left empty.

- To add a new row use the Add New (plus sign in circle) icon on the left-hand side of the table or click on any field in the last line.

- To add a row between two existing lines, select the second of two lines and use the context-menu. The new row will be inserted above the selected line.
- Click the column header to change the sort order of a column. A black triangle indicates ascending or descending sort order.
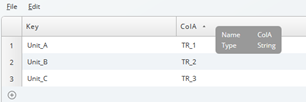
- A tooltip with the information about the allowed data Type appears when hovering over the column headers.
- The width of a column can be adjusted by hovering over the boundary of a column until a double arrow appears. Click and drag to resize.
- Press Save when all data records are entered.
An error message above the table indicates when some data does not match the column type, format, or the nullable option, and the table cannot be saved.
In the example below column ColC is empty in line 3, but the field must be filled out because the column is not nullable.

Figure 4: Example Error, ColC is Not Nullable and is Empty
In the image below the table failed to save because a number value is expected, and a string of characters was entered.

Figure 5: Example Error, Incorrect Value Entered in ColC
Click on Details... to the right of the error message to view error logging information. The first line in the details shows the reason for the error: JCS-102176: Column ColC for key Unit_C is a number, value abc cannot be parsed.
The Search bar, shown in the image below is useful in tables with a large amount of data records. Enter a search query and all matching values will be filtered and highlighted.

Figure 6: Search Bar
Menu Bar
There are two menus available: File and Edit.
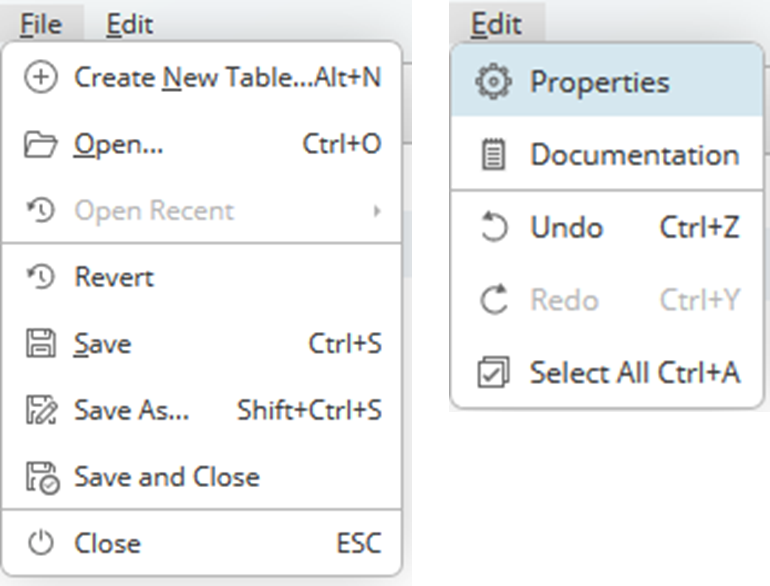
Figure 7: File and Edit Menu Options
- The File menu contains the following options:
- Create New Table
- Open a file
- Revert undoes all changes until the most recent time the table was last saved
- Save, Save as, and Save and Close
- The Edit menu contains the following options:
- Properties allows you to rename the table and enter a meaningful description
- Documentation
- The Undo option reverses every single step until the most recent saving
- Redo
- Select All
Parameters
The following parameters can be set in your CUS_Home_Modules parameter field for the table editor:
The tableBusinessKeys parameter syntax is tableBusinessKeys=table:<partition>.<name>[;table:<partition>.<name>]*, allows you to specify business keys of available tables in the table editor.
| Name | Description | Syntax |
|---|---|---|
tableBusinessKeys | List of table BusinessKeys to make available in the table editor | tableBusinessKeys=table:<partition>.<name>[;[table:]<partition>.<name>]* |
filterColumnName | Column to filter on | filterColumnName=<column_name> |
filterColumnValue | Table value to filter on | filterColumnValue=<value> |
fixRows | Make the rows non-resizable | fixRows=true |
jobId | Process ID of a target process; should not be in a final state (Completed,Error,Canceled...). | jobId=1234 |
jobFileRef | Process file expression for the source. | jobFileRef=JobFile:<process_id>:<file_name> |
hiddenColumns | Columns to hide in the table | hiddenColumns=<column_name1>[;<column_name2>]* |
constraintExternalTable | Constraint table containing table settings | constraintExternalTable=Table:<partition>.<table_name> |
tip
In syntax expressions, elements between square brackets ([]) are optional, and * means zero or more. For example, the syntax tableBusinessKeys=table:<partition>.<name>[;[table:]<partition>.<name>]* means tableBusinessKeys=table: followed by the partition of the first table, a dot (.), and the name of the first table. Optionally, if you want to specify another, you must specify semi-colon (;) subsequent table: syntax elements are optional, followed by the partition of the second table, a dot, and the table name (;, optional table:, partition, dot, name can be repeated at will, in this order). For example: tableBusinessKeys=table:REDWOOD.Table1;REDWOOD.Table2;REDWOOD.Table3;table:REDWOOD.Table4
URL Parameters
You can also specify parameters in the URL of the table editor:
INVOCATION- (madatory) unique identifier for the instance, for exampleINVOCATION=TS123456789.C_Constant_C_- prefix for the above parameters, value must be URL-encoded.- Example:
C_Constant_C_tableBusinessKeys- syntax isC_Constant_C_tableBusinessKeys=Table%3A<partition>.<name>[%3B<parition.name>]*(%3Ais:and%3Bis;, URL encoded).
- Example:
C_Constant_C_ExternalTitle- title of the table editor screen, defaults to Table Editor.
These are generally used in email body Documents that get sent with workflow processes.
<p><a href="../../../../api-extension/Internal/REDWOOD/Custom_RTXEditor/?C_Constant_C_jobFileRef=${Message1}&C_Constant_C_jobId=${J:#JobId}
&C_Constant_C_constraintExternalTable=REDWOOD.AP_ReconciledItemsColumns
&C_Constant_C_fixRows=true
&INVOCATION=<any number>
" target="_blank">Blocks</a></p>
Example in workflow text parameters
='JobFile:'+JobChainParameters.getJobId('Step DT1, Job 1')+':Update_Block.rtx'
Example for the Message1 parameter in workflow processes
<a href="${P:RT_TableEditor}?X_Output=popup&C_Constant_C_jobFileRef=${Message1}&C_Constant_C_jobId=${J:#JobId}
&C_Constant_C_constraintExternalTable=FCA.CUS_TD3660_Constraint_Block&C_Constant_C_fixRows=true" target="_blank">Update Block</a><br>
Example for workflow text
=FCA.Custom_Redwood_FPA.getContextURL()+'/api-extension/Internal/FCA/Custom_RTXEditor/'
Example using REL to retrieve the context-path, for example, https://server/redwood/
Constraint Table
You use the FCA_ApplicationCustomizing_Definition table definition to create constraint tables for use with the table editor.
The following constraints are available:
| Constraint | Description |
|---|---|
@Immutable | Makes a column immutable, you cannot change values in it. |
@Hidden | Hides a column from the table editor; it is not displayed. |
<element1>,<element2>[,<elementN>]* | List of allowed values. |
Syntax:
| Key | Value | Description | Component |
|---|---|---|---|
<column_name> | <constraint> | [<optional_description>] | <constraint> |
| ... | ... | ... | ... |
Example:
| Key | Value | Description | Component |
|---|---|---|---|
Key | @Hidden | @Hidden | |
SOX | High,Medium,Low | High,Medium,Low | |
REF# | @Immutable | @Immutable |
Upgrading from 9.2.8 or earlier
If you upgraded from 9.2.8 or earlier, the table editor parameter tableBusinessKeys used to be called filterOnBusinessKey; if you use that parameter, you will have to update your tables to use the new name. You can update all your CUS_Home_Modules table(s) using the following script:
{
  String TABLE_EDITOR_EXTENSION_POINT = "Redwood_TableEditor";
  String CUS_HOME_MODULES = "Home_Modules_Def";
  String FILTER_ON_BUSINESS_KEY = "filterOnBusinessKey";
  String TABLE_BUSINESS_KEYS = "tableBusinessKeys";
  String COLUMN_PARAMETERES = "parameters";
  Partition p = jcsSession.getPartitionByName("REDWOOD");
  TableDefinition td = jcsSession.getTableDefinitionByName(p, CUS_HOME_MODULES);
  if (tableDef == null)
  {
    jcsOut.println("If you have RFA installed, you did not install it into partition " + p.getName()
    + ". Please change the line 'Partition p = jcsSession.getPartitionByName(...);' and insert the name"
    + " of the partition you use for RFA in double quotes (\"). \n"
    + "For example:\n"
    + "Partition p = jcsSession.getPartitionByName(\"FCA\");\n"
    + "for partition FCA in this example");
    return;
  }
  com.redwood.scheduler.api.model.interfaces.RWIterable<Table> tables = td.getTables();
  jcsOut.println("Checking tables:");
  for (Table table : tables)
  {
    if (table.getName().startsWith("CUS_"))
    {
      jcsOut.println(table.getName());
      for (TableValue tv : table.getTableValues())
      {
        if ("name".equals(tv.getColumnName()) && TABLE_EDITOR_EXTENSION_POINT.equals(tv.getColumnValue()))
        {
          String key = tv.getKey();
          TableValue param = table.getTableValueBySearchKeySearchColumnName(key, COLUMN_PARAMETERES);
          if (param != null)
          {
            String cv = param.getColumnValue();
            if (cv != null && cv.contains(FILTER_ON_BUSINESS_KEY))
            {
              jcsOut.println("Fixing table " + table.getName());
              param.setColumnValue(cv.replace(FILTER_ON_BUSINESS_KEY, TABLE_BUSINESS_KEYS));
            }
            else
            {
              jcsOut.println("Table '" + table.getName() + "' is not affected.");
            }
          }
        }
      }
    }
  }
  jcsOut.println("Saving table(s).");
  jcsSession.persist();
}
Code to update your CUS_Home_Modules tables.
financeTopic